Wound care is a skill needed in every clinical setting – from acute hospital wards and community clinics to patients’ homes.
“It’s not just the physical healing of a wound that’s crucial: effective wound care has a positive impact on infection control, pain management, mobility, and your patients’ psychological wellbeing,” says Callum Metcalfe-O'Shea, RCN Professional Lead for Long-Term Conditions.
Whether you need to assess a simple wound such as a skin tear, acute wound or minor burn, or want tips on safe soft bandaging – watch our videos below and read on.
Stages of wound healing
There are four key stages of healing: homeostasis, inflammation, proliferation and remodelling. Understanding these can help to effectively assess, document and know when a wound requires intervention.
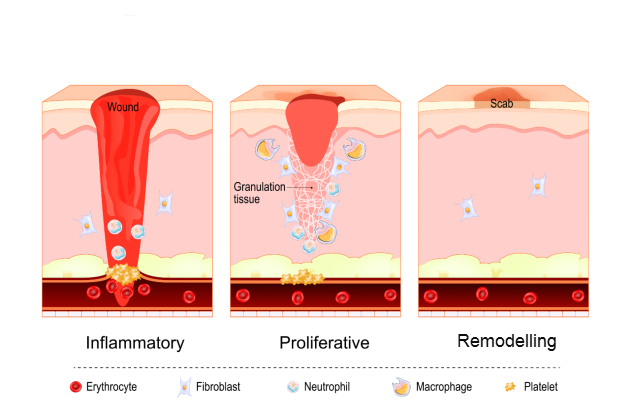
Homeostasis (immediate response): this stage begins within minutes of injury. Blood vessels constrict, platelets aggregate and a clot forms to stop any bleeding.
Inflammation (protective phase): the inflammation stage, when white blood cells (neutrophils and macrophages) migrate to the wound, clearing debris and bacteria, can last around one to four days. It’s common for the wound to be painful, for it to appear red and swollen and feel warm.Proliferation (repair phase): the repair stage typically happens around four to 24 days after the injury. New tissue begins to form, fibroblasts produce collagen, capillaries grow and granulation tissue fills the wound bed. Epithelial cells also migrate to cover the wound.
Remodelling/maturation (strengthening phase): this stage can last weeks to months (in some cases, up to a year). You can expect collagen fibres to reorganise, scar tissue to strengthen and the wound begin to close.
- Read next: How to perform a mole check
Before reviewing a wound
To prevent wounds deteriorating, it’s essential that registered nurses undertake a full holistic assessment to identify possible causes.
“A holistic assessment ensures that wound care isn't seen in isolation but as part of the patient’s overall health and healing capacity,” says Callum.
Key areas to focus on can include:
- patient history and comorbidities: diabetes, vascular disease, immobility, malnutrition or immunosuppression can all impair healing
- medication: corticosteroids, anticoagulants or chemotherapy agents may affect wound progression, too
- lifestyle and social factors: smoking, alcohol use, mobility, and your patients' support systems also influence recovery
- pain and comfort levels: pain assessment will guide which dressing you choose and ensures you’re delivering patient-centred care
- nutritional status: adequate protein, vitamins, and hydration are critical for tissue repair
- psychological wellbeing: anxiety, depression, or poor coping strategies can all impact a patient's capability to follow wound care plans.
Using the TIME tool
TIME is a clinical, decision-support tool for managing wounds which is efficient, effective and easy to follow.
TIME stands for:
- Tissue
- Infection/Inflammation
- Moisture
- Edge of the wound.
“Structured assessments, like the TIME tool, can be used in any clinical setting to achieve better patient outcomes,” advises Callum.
Here are the four steps you need to follow and then repeat for each reassessment.
Step 1: tissue
• Identify the tissue in the wound:
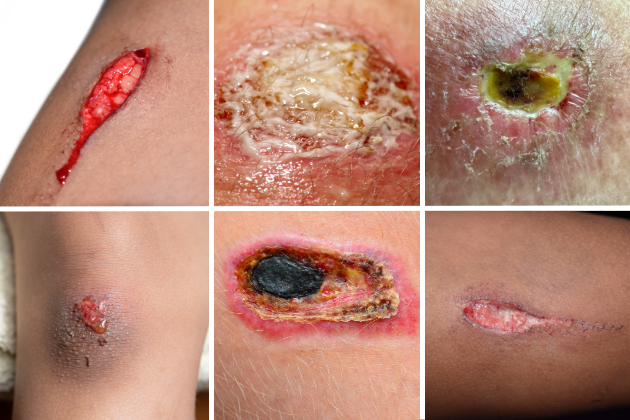
- viable tissue – is there granulation (the appearance of red, bumpy tissue) or epithelialisation present (pale pink or white tissue)?
- non-viable tissue – is there slough (typically yellow or white tissue that can be moist or dry), necrosis (dead tissue, which is brown or black and can be hard), or eschar tissue (typically black, dry and hard) present?
• Assess whether debridement or cleansing is required. If the wound contains lots of devitalised tissue, this may require referral to a specialist tissue viability nursing service.
Step 2: infection/inflammation
• Next, look for local signs of redness, swelling, heat, pain, odour or increased exudate (discharge/fluid). Also consider systemic signs – especially fever, tiredness and raised inflammatory markers.
• In darker skin tones, redness may be less obvious, so focus on other key signs of infection.
• Following local policy and templates, document any findings and escalate if an infection is suspected.
Step 3: moisture balance
• You’ll need to assess for any discharge or fluid, documenting the amount, colour and consistency. Also check the surrounding skin for maceration (white, softened, wrinkled skin) or dryness.
• Select dressings that maintain an optimal moist environment without excess fluid.
Step 4: edge of wound
• Finally, observe the margins of the wound. Are the edges advancing closer together, not moving, or rolled over?
• Track how healing is progressing by recording any changes you notice.
Reassessment and documentation
• It’s important to then reassess the wound at every dressing change.
• You’ll need to document the size of the wound, tissue type, exudate, infection status and edge condition (always following local policy and documentation templates).
• If possible, use photographs (with consent) to support monitoring.
Choosing the right dressing
Once you’ve completed your assessment, you’ll need to apply a dressing that complements the stage of healing.
“Choosing the right dressing isn’t just a task – it’s a clinical decision that influences the trajectory and quality of wound healing. The right dressing protects and supports tissue repair and gives the wound exactly what it needs to aid healing,” advises Cathryn Smith, RCN Professional Lead for Adult Community Nursing.
Whether you need to add moisture, prevent maceration, absorb fluid or reduce bacteria, Cath recommends using the BNF’s (British National Formulary) helpful wound management guide, which details what dressing should be applied depending on the type of wound and the stage of healing.
Mastering soft bandaging
At times, safe soft bandaging is needed to support wound healing on the lower limbs.
Soft bandaging can be tricky at first, but it gets easier the more you do it
This technique is ideal for securing dressings when adhesive coverings can’t be used, managing lower leg oedema, or as a temporary measure when wounds are awaiting a specialist review.
“Soft bandaging can be tricky at first, but it gets easier the more you do it,” encourages Cath.
“Keep practising – it plays a big role in looking after people with lower-limb wounds, keeping them comfortable, supported, and on the right track for healing”.
Want to learn more?
If you want to know more about why it's important to bandage from joint to joint, or the differences between soft bandaging, two-layer and compression bandaging, watch our quick Q&A with Cath and Callum.
When to escalate to specialist services
All registered nurses are expected to carry out holistic wound assessment and management, but there are circumstances where you’ll need to escalate to tissue viability, leg ulcer clinics or specialist wound care services.
Escalate if you observe or experience:
- signs of infection not resolving
- delayed or stalled healing
- complex wound types
- underlying comorbidities
- dressing or compression challengessafeguarding, neglect, or quality of life concerns.
Callum says: “Optimal assessment and timely, evidence-based treatments are not optional – they’re essential for improving outcomes, restoring dignity, and ensuring the best possible quality of life for your patients.”
Further resources
Head to RCN Learn to access our resource on how to identify patients at risk of lower-limb wounds and deliver safe, early interventions.
Want to start a conversation about how a wound is affecting a patient's quality of life? Access this checklist developed by Keele University and endorsed by the RCN.
Join one of our professional forums. There are more than 30 to choose from and each one is open to students, nursing support workers, nurses and midwives.